

There are several ways to connect PZEM-016 energy meter (RS485 ModBus output). I will cover each of them.
The first way to connect – using RS485 to TTL converter, Wemos D1 mini (esp8266) board and ESPHOME add-on (ver. 1.18.0) in Home Assistant 2021 (core-2021.6.0, supervisor-2021.05.4, Home Assistant OS 5.13) This method is convenient because PZEM-016 is connected via a wireless network (ESPHome WiFi).
The wiring diagram is shown below:
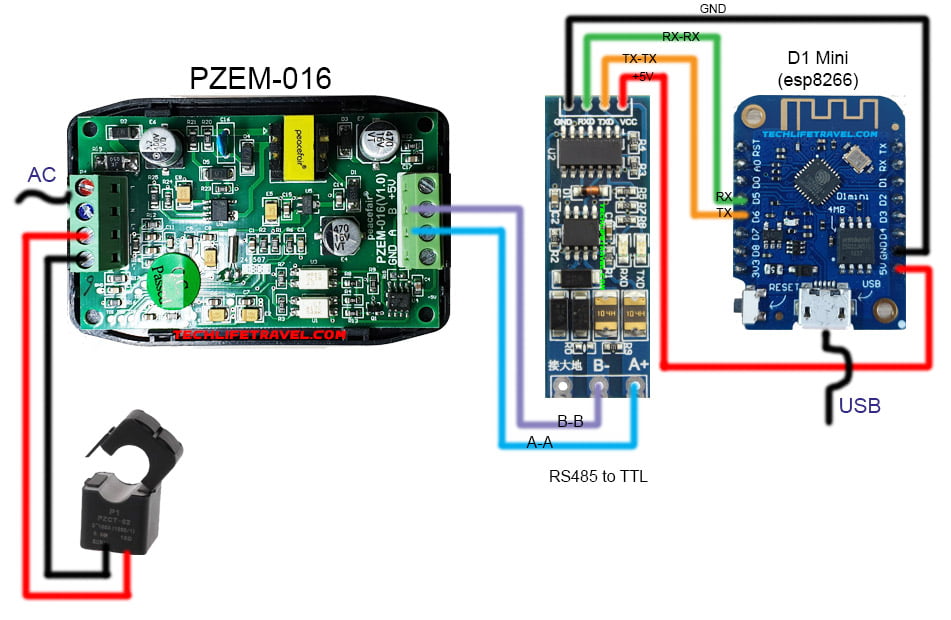
Please note that the ports of the converter are connected as is, not crosswise – A to A, B to B, TX to TX, RX to RX!
Use 5V connector, not 3.3V from D1 mini (yes, it safe), otherwise the system will not work correctly.
Next, you need to open ESPHOME add-on and add your Wemos D1 mini board with code:
esphome:
  name: esphome006
  platform: ESP8266
  board: d1_mini

#visit techlifetravel.com for more info

wifi:
  ssid: "YOUR_AP"
  password: "YOUR_AP_PASSWORD"
  fast_connect: on

# Enable logging
logger:

# Enable Home Assistant API
api:
  password: "YOUR_HA_API_PASSWORD"

ota:
  password: "YOUR_HA_API_PASSWORD"

#
uart:
  rx_pin: D5
  tx_pin: D6
  baud_rate: 9600
  stop_bits: 1

sensor:
  - platform: pzemac
    current:
      name: "PZEM-016 Current"
    voltage:
      name: "PZEM-016 Voltage"
    energy:
      name: "PZEM-016 Energy"
    power:
      name: "PZEM-016 Power"
    frequency:
      name: "PZEM-016 Frequency"
    power_factor:
      name: "PZEM-016 Power Factor"
    update_interval: 10s
#
  - platform: wifi_signal
    name: "esphome006 WiFi signal"
    update_interval: 60s
  - platform: uptime
    name: esphome006 Uptime

time:
  - platform: homeassistant
    id: hass_time
If everything is done correctly, then in the esphome log you will see the data coming from your PZEM-016 energy monitor:

[03:12:38][D][pzemac:049]: PZEM AC: V=232.3 V, I=0.000 A, P=0.5 W, E=91.0 Wh, F=50.0 Hz, PF=1.00
[03:12:38][D][sensor:099]: 'PZEM-016 Voltage': Sending state 232.30000 V with 1 decimals of accuracy
[03:12:38][D][sensor:099]: 'PZEM-016 Current': Sending state 0.00000 A with 3 decimals of accuracy
[03:12:38][D][sensor:099]: 'PZEM-016 Power': Sending state 0.50000 W with 2 decimals of accuracy
[03:12:38][D][sensor:099]: 'PZEM-016 Energy': Sending state 91.00000 Wh with 0 decimals of accuracy
[03:12:38][D][sensor:099]: 'PZEM-016 Frequency': Sending state 50.00000 Hz with 1 decimals of accuracy
[03:12:38][D][sensor:099]: 'PZEM-016 Power Factor': Sending state 1.00000  with 2 decimals of accuracy
Now you can add PZEM-016 energy meter readings to your Home Assistant dashboard:

This completes the setup. In the second part you can read how to connect PZEM-016 using a RS485 to USB converter directly to Home Assistant server.